Day 35: Food Preservation Part I—Canning
Dear Student,
To truly become self-sufficient, you must start to produce the majority of your own foodstuffs. Many shy away from what they think must be complex cooking from scratch… things like bread, pasta, and dairy all seem like advanced, highly technical, and far-too-time-consuming processes for our modern minds.
Likewise, people often think that anything that requires a process—fermentation, distillation, pickling, curing, drying and smoking, etc.—must be out of reach for the average homesteader.
These misconceptions couldn’t be farther from the truth. All these things are not only possible to make or do yourself but are often much easier than you anticipate.
Over the next few days, I’m going to elucidate some of these concepts for you and show you just how easy it is to produce the majority of your own food. Though much of it takes a few steps more than simply collecting eggs or milking the cow, food isn’t complex. Our uneducated, uncivilized ancestors managed to feed themselves for millennia before modern conveniences came along…
Get ready to get your hands dirty over the next few days. Well, actually, you’ll need to wash your hands well before doing any of the following, but you get my point… Prepare yourself to dig in, is perhaps a more apt metaphor… once you get started, you’ll be dying to dig into your 100% homemade dishes…
Canning Foods
Food preservation is a key part of living the self-sufficient life. There are many ways to preserve food, but canning is one of the overall best and easiest methods, so we’ll start there. It’s still quite a popular method of preserving food in modern North America.
Canning is popular because it allows food to retain a lot of the flavor, texture, and nutrition that it started with. Plus, it’s a relatively simple process and doesn’t require expensive equipment.
Canning is the process of using heat to destroy pathogens in food, and then storing it in airtight containers. Oxygen is removed to retard the growth of bacteria, yeasts, fungi, and enzymes and also creates a vacuum seal in the jars.
It’s possible to can most food stuffs, including meat, vegetables, and fruit. However, you must be careful with meat, as incorrect canning can cause illness. Sauces can be canned and stored for quick and easy meals when you’re pressed for time… and I’ll bet your homemade marinara is much better than Prego’s!
This is a great way to allow yourself to buy wholesale quantities of a certain type of food when it’s in season or especially cheap. Or when your farm produces more than you can reasonably consume before it goes bad. No need to use it all immediately, just can it.
Unlike freezing, canned food doesn’t require any effort or energy to keep preserved, so there are no ongoing storage costs.
 Equipment needed:
- Pressure canner or pressure cooker
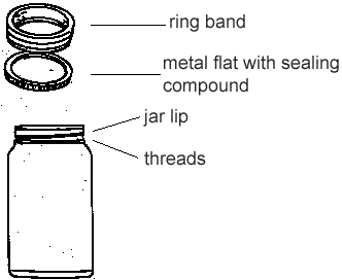
- Jars and lids*
- Jar lifter
- Clock to time the process
- Thermometer
*Choose jars designed for home canning (made to be reusable and to withstand the heat) with wide mouths to allow ease of filling and emptying.
General Guidelines:
- D
 on’t use any seasoning other than salt, as some may encourage spoilage. Just add your seasoning when you reheat the food.
 - Before canning, all equipment should be sterilized. Jars or cans used for fruit or vegetables must be sterilized without fail, though receptacles for meat don’t necessarily need to be, as the high-pressure cooking or canning process takes care of microorganisms anyway.
- Meat to be canned must be fresh—take no chances here. You should not can meat if there’s even the smallest doubt about its freshness. If you have fresh meat but don’t intend to can it right away, you can freeze it until you are ready for canning.
- Avoid excessively fatty meat, as it spoils quicker than lean. Trim meat of all fat if possible, and aim for smaller chunks, as they will both fit better in the jars and store better. Large fleshy pieces should be rolled. Don’t cram the meat into the jars, as it affects the cooking process. Screw the lid on tight and boil in the can for the prescribed time on the recipe.
- When canning meat, for every 2,000 feet you are above sea level, increase the pressure in the canner by 1 pound from the recommended level to account for the atmospheric difference.
Safety:
- Cleanliness is essential.
- Bring canned meat back to the boil for 15 minutes before eating.
- If there is a foul odor from any canned food never taste it, destroy it.
Canning Methods
Boiling Water Bath Method
Suitable for high-acid fruits and tomatoes (not meat).
Process:
- Place food in jars filled to the brim.
- Screw lid loosely on.
- Immerse jars in water up to a couple inches of the jar tops.
- Boil for the prescribed length of time for the food type and tighten the lids.
Pressure Canning
Any food can be safely preserved with a pressure canner, and it’s the only safe way to can meat, which must be kept at 240°F (116°C) to kill the bacteria.
The pressure canner must have a rack inside to keep jars off the bottom of the appliance. Follow the manufacturer’s instructions carefully.
Meat packing can be done in two ways:
- Raw Packing: Pack the pieces of raw meat loosely into the jars with no liquid.
- Hot Packing: Pre-cooked meat is packed into jars, and liquid (stock) is added depending on the recipe.
Basic Process:
- Leave enough headspace at the top of the jar to allow for expansion during heating and to make a vacuum when it cools.
- Use a spatula to move contents and release air bubbles before sealing.
- Wipe the lip clean before closing to ensure a tight seal.
- Place the lid with the gasket facing down, then place the metal screw band down over the gasket and screw on until you feel some resistance—don’t overtighten.
- Place in the pressure canner or pressure cooker. Don’t allow jars to touch, as this might lead to uneven cooking and spoilage. Cook for the time prescribed in your recipe.
- When done, take the pot or pressure cooker off the stove and release the heat if using a pressure cooker.
- Let sit for 15 minutes and then remove from the water and let cool.
- The next day, check to see if the vacuum seal has held by tapping on the center of the jar lid. If the lid can be pressed down or makes a popping sound, then the seal has been broken and you must attempt to repeat the canning process to reseal the can.
Reference Charts And Pro Tips
In the Further Resources list below, you’ll find a link to a reference chart showing packing method, jar size, headspace, process time, dial gauge, and weighted gauge for pressure canning low-acid foods, as well as a chart for pressure canning or water bathing acid foods.
This chart is provided for experienced canners familiar with safe canning methods. Times given assume a full 10-minute exhausting of the pressure canner; once pressure is raised to an accurate level and stabilized, timing begins according to chart.
They also share a few tips on the same page…
For Pressure Canning Low-Acid Foods
- Process time is the most notable variable to pay attention to.
- Headspace is often 1 inch but varies for some foods.
- The dial gauge is 11 PSI for all foods.
- The weighted gauge is 15 PSI for all foods.
For Pressure Canning Or Boiling Water Bathing High-Acid Foods
- For either method used, time is the most notable variable to pay attention to.
- Headspace is mostly a half inch but can be a quarter inch for some foods.
- The dial gauge is 6 or 11 PSI.
- The weighted gauge is 10 or 15 PSI.
To ensure safe acidity in canned tomato products, add bottled lemon juice, vinegar, or citric acid directly to the jars before filling with product:
- For pints, add one of the following:
- 1 tablespoon bottled lemon juice
- 2 tablespoon vinegar
- 1/4 teaspoon citric acid to each pint of tomatoes
- For quarts, add one of the following:
- 2 tablespoons bottled lemon juice
- 4 tablespoons vinegar
- 1/2 teaspoon citric acid to each quart of tomatoes
To offset an acid taste in tomato products, you may want to add sugar.