Day 15: Planting Your Garden II—Which Gardening Style To Use?
Dear Student,
These days, there are many different schools on intensive organic gardening to follow, including bio-intensive gardening, square-foot gardening, and permaculture gardening. These and other methods all work well and are all similar in some or most of their practices.
Great teachers and pioneers like Elliot Coleman, his disciple Jean Marie Fortier, and permaculture co-founder David Holmgren have shown generations how to achieve massive yet sustainable yields from small plots of land—without backbreaking work.
To feed my family, I don’t need to produce 10 tons of food per acre. And with more space, I could afford to produce a little less per square foot if it takes a lot less effort to produce.
Permaculture techniques always augment a garden, but for a simple easy garden bed design to start the lasagna method might make the most sense…
Lasagna Gardening
No, this doesn’t mean growing a lasagna bush… unfortunately. (Side note: There actually is a squash called the spaghetti squash—cut it open to scoop out the stringy interior and cook it like spaghetti for a gluten-free pasta substitute.)
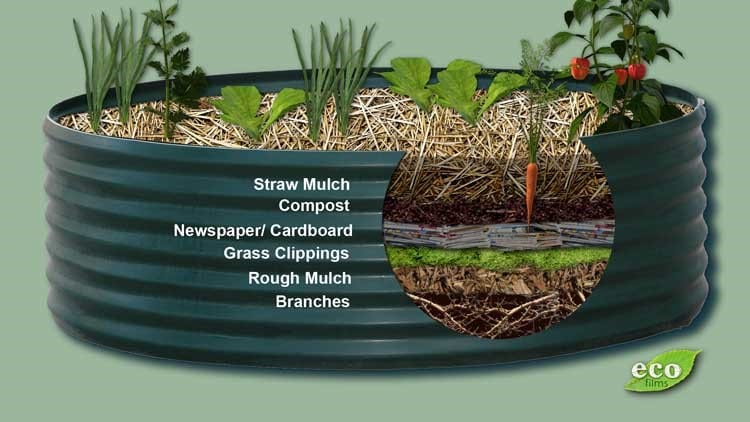
Also called mulch gardening, large amounts of food can be grown by simply constructing a “lasagna” garden bed at the start of the season and planting into it. These beds are also known as no-dig gardens, and they might not yield as much in its first years as other intensive methods mentioned, but they take a fraction of the effort and cost.
The huge amount of mulch used both breaks down over the season to feed the bed (removing the need for you to do it) and also retains large amounts of moisture in the soil (meaning less watering done by you).
Copyright: Green Bean Connection
How To Make A Lasagna Bed
Lasagna beds are easy to make and maintain. Gathering the materials to construct the bed is what takes the longest.
The materials in a lasagna bed are classified as low-nitrogen (or high-carbon; brown material like cardboard, dry leaves, or wood chips) and high-nitrogen (green material like fresh grass clippings, kitchen waste, or animal manure).
Materials Needed:
- Old cardboard and paper (not glossy); heavy corrugated boxes are great
- Manure or kitchen wastes
- Mature compost or potting soil for seedlings and transplanting
- Old leaves or grass clippings, peat moss (high-carbon)
- Fresh leaves, grass clippings, animal manure (high-nitrogen)
- Small twigs and woodchips for the heavy top mulch
- Wood ash and compost
- 6 seeds (can be saved from last year’s harvest, taken from mature vegetables you get at the market, or purchasing them directly or online.)
- Potting mix*
*A potting mix is a blend of well matured compost and sharp sand (river sand) that’s ideal for the germination of healthy, easily transplantable plants. A potting soil mix should be well drained, contain all the essential nutrients for a healthy seedling, and have little clay to interfere with transplanting. For large seeds use a mix of 20% to 30% sand to 70% to 80% compost; for small seeds use a 50-50 mix.
Equipment Needed:
- Seedling trays
- Dibbler stick to make the holes for the seeds (pencil will do)
- Watering can, automatic mister, or irrigation lines depending on scale and budget
- Shade cloth or semi shaded area in hot or tropical climates
- Sharp knife to cut through the cardboard
Making A Lasagna Bed:
- Mark out or designate the area best-suited for your garden. Good soil is preferable but not essential because of this productive and soil enhancing technique. Try not to make the beds more than 4-feet wide to avoid having to step on and compact your bed when you are tending it.
- Sprinkle the fresh animal manure or kitchen waste over the space at a rate of 5 gallons per 20 square feet.
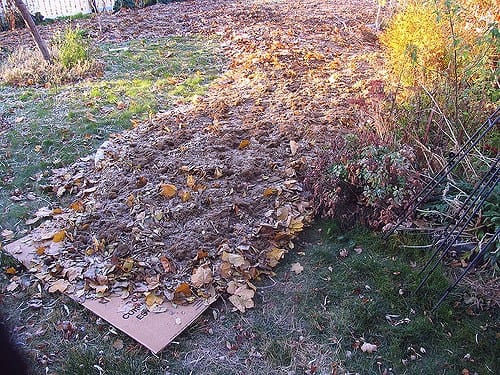
- Cover with several layers of flattened cardboard, paper, or newspaper. Sprinkle with water after each couple of layers. Don’t worry about it being too thick, a minimum of 2 inches is what you want. This will suppress and smother all weeds in the soil.
- Place a thick layer (3 inches) of grass clipping, green mulch, or shredded leaves (green) on the cardboard, followed by a thin layer of compost or kitchen wastes (green) followed by thick layer of dried leaf or dried grass clippings (brown).
- Follow this layering pattern without adding more cardboard—as if you were making a lasagna for dinner—until the pile is at least 18 inches deep when packed down. Sprinkle with wood ash and compost as you go.
- Cover with a thick layer of slow degrading wood chips or high-carbon mulch on top.
- Let sit for a month, watering enough to keep moist.
- When you’re ready to plant, ensure the season and climate is suitable for the seedlings (about two weeks after the last predicted frost).
Potting Your Seeds:
- Place the potting mix in seedling trays and tamp down gently to ensure there are no air pockets.
- Make a hole with the dibbler three times as deep as the width of the seed at its narrowest point.
- Place two or three seeds in each hole and gently cover with potting mix or close the hole up.
- In cold climates, place in a sunny spot but ensure it doesn’t get too hot. In hot climates, place in semi-shade or under some shade cloth to ensure the seedling don’t burn under intense sun.
- Water immediately and at least daily until plants have germinated… but don’t overwater. The potting soil is loose and doesn’t hold water well, but it’s essential that the soil doesn’t dry out. (If money isn’t an object or if you want to propagate a large number of seedlings at the same time, it might be worth investing in an automatic mister or irrigation system to ensure your seedlings are correctly watered and to save you time.)
- The seedlings should sprout in a couple of days to weeks later depending on the seed and variety.
- Not all seeds will germinate, but if none germinate at all, check that they aren’t out of date, weren’t badly stored, and/or that the climate didn’t affect germination (e.g. the tray dried out or was left in freezing conditions) and try again.
- As soon as the first set of real leaves grow on the top of the seedling (not the two initial sprout leaves), it’s time to harden the seedlings off. To do this, place them outdoors for a couple hours every day for a week, leaving them outdoors or in full exposure for longer each day to let the plants adapt to the local environment. After a week, the plants should be ready to plant into your lasagna bed.
Planting The Lasagna Bed:
- Locate the spot you want to transplant your seedling to and scoop the mulch aside.
- Cut though the cardboard in an X shape and pull aside or remove the flaps.
- Loosen the soil under the hole in the cardboard and make a small hole in the ground slightly larger than the seedling tray pod size; add some compost.
- Gently remove your seedling from the tray and, holding the root ball together as much as possible, place it in the hole.
- Pack some more compost around the roots and gently arrange the mulch around the seedling—but without packing the stem with too much mulch, which can cause fungus issues.
- Water the lasagna bed until water seeps out the bottom of the bed.
- Continue planting out your bed in this manner. Spacing between the plants depends on the variety and species of plant, so you’ll need to consult the seller or seed catalogue for every new plant you put in the bed.
- Consider interplanting different crops into the same bed to maximize space. For example, interplant fast-growing radishes between corn plantings to allow for a double crop. The radishes will be ready to be pulled out within a month before the corn gets too big and competes with the radishes.
- Depending on your climate and circumstances, you might choose to cover the beds with raised insect netting or shade cloth, as needed.
Companion Planting
Since time immemorial, humankind has recognized that particular plants do well went planted in association with other specific plants.
The Three Sisters Method
The best-known example of companion planting is the Three Sisters method of planting corn, beans, and squash in the same mound, thought to have been given by the native population to early settlers in the United States.
Here’s how they synergize:
- Fast-growing corn provides a trellis for the beans to grow up.
- Beans provide nitrogen from the air to the other crops.
- The squash provides heavy ground cover that shades out weeds and retains moisture as a living mulch.
In this manner, three unrelated species of plants grown close together produce more in one space than any of them could alone.
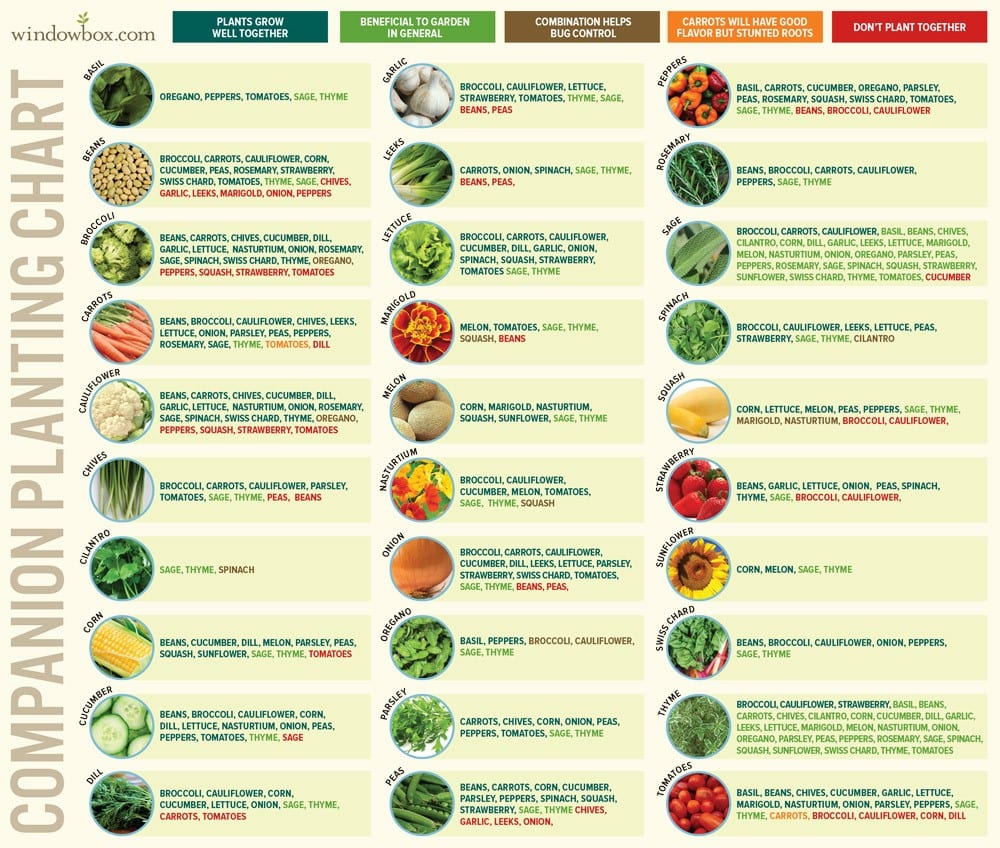
Conversely, there are also plants that can be harmful when planted close together, reducing the yields of plants around them.
Take a look at the chart below as a starter guide, and be sure you research every seed you plant to be sure of its companion and enemy plants.
Food Forests
Mentioned on Day 11, food forests are another extremely efficient way to design a part of your homestead. Stay tuned for tomorrow’s class for the full lesson on food forests…