Day 17: Water On The Homestead
Dear Student,
With yet another chapter under your belt, we can move on to some more complex forms of farming, namely, those that use water as a medium. Over the next few days we’ll be talking water and how to best put it to work for you…
Water is essential for all life on Earth, and, hand-in-hand with oxygen, it’s the most important element in your self-sufficiency endeavor.
We need water for the creation and sustenance of all life, for farming and aquaculture, and for energy production, and about 71% of our planet’s surface is covered in water…
But how much of it is usable?
- Nearly 97% of all Earth’s water is saline and therefore of little use for land-based aquaculture…
- Of the remaining 3%, nearly 69% is frozen in icecaps…
- Of the unfrozen fresh water, 11% is available in underground aquafers (which can be refilled by using water harvesting techniques)…
- Another 13.5% of this unfrozen water is deep water which is pumped but will not be refilled from rainfall…
- Nearly 0.3% is in lakes…
- 05% is in soil…
- 006% is in rivers…
- 04% is in the atmosphere.
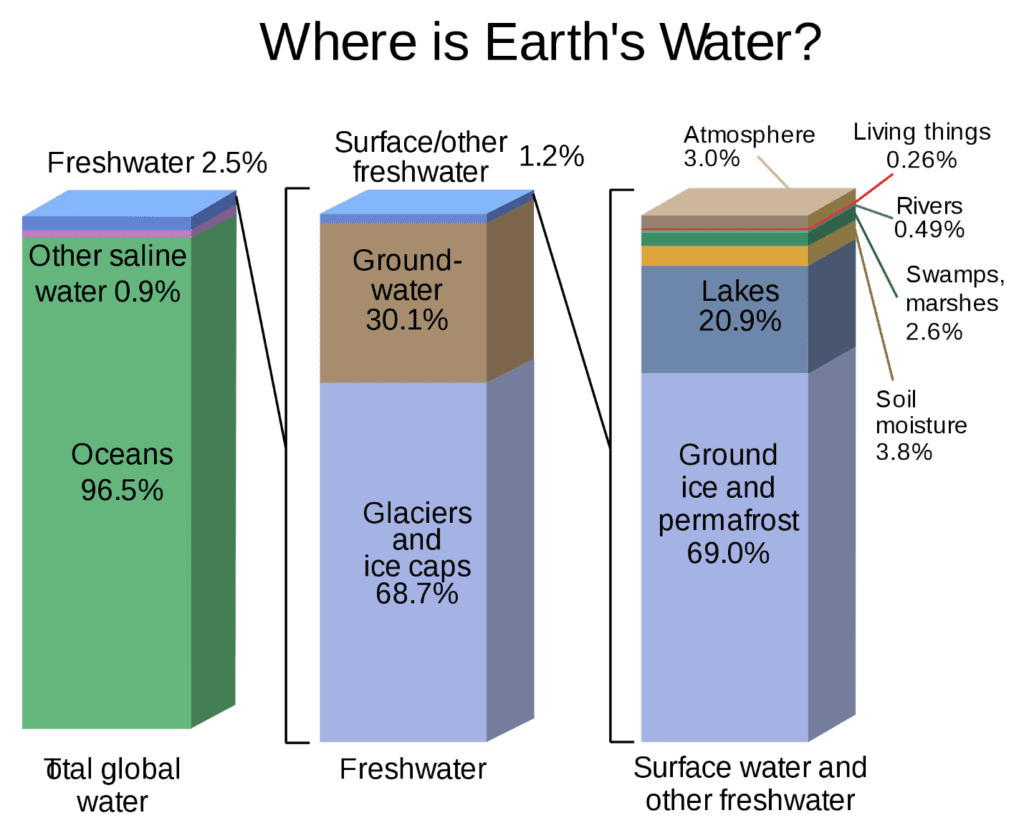 As you see, only a small fraction of the water on Earth is available to us, making the need to do so sustainably even more important.
Rainwater catchment for your home is possible with concrete or plastic cisterns, but these become too costly for full farm water storage.
If you have no water source available on your property already, don’t worry, you can harvest it: Water wells can be drilled or dug to harvest water or you can create ponds and dams.
Catchment
Catchment is the area that collects what water falls directly on your land and then directs it through your property from uphill. At its most basic, this could be a pond or other body of water with some system to pass it on from there.
You can increase the size of your catchment by using swales to catch water. Swales are drainage channels dug on contour (joining areas of equal elevation) that are designed to capture and soak water into the landscape. Swales also distribute nutrients around your property so that you don’t need to do so manually.
On the downhill side of the swale, the material from the swale is mounted up and planted with trees and productive plants.
Don’t allow large livestock onto your swale mounds, as they will compact them and will reduce their ability to soak water into the landscape.
Swales can divert running water from one catchment to another and are excellent aquifer refilling tools.
How To Calculate Your Water Catchment
- One inch of rain falling on one square foot of catchment surface equals 0.623 gallons of water.
- One inch of rain falling on a 1,000-square-foot catchment area equals 600 gallons of water.
- One inch of rain failing on 1 acre of catchment surface equals 27,000 gallons of water.
- Calculate your catchment surface area.
- Multiply your catchment area by the average rainfall to calculate your average catchment volume.
Types Of Dams
A dam is needed in most cases to keep your water in its catchment, as catchments are often on slopes.
Saddle dam: This a dam built in the valley between two hills. Two dam walls must be built to capture the water at this height. These are also often fed by swales.
Contour dam: This dam is dug into the side of a hill on contour and uses the hill face as its back wall. Dam/pond walls are built on the downhill side of the dam.
Ridge point dam: These uncommon dams are built close to the top of hills. Having no catchment of their own, they must be fed water by swales on contour around the top of the hill.
Earth tank: This is a holding tank that is effectively a large cistern. It is not fed from catchment, water has to be pumped into it. Ram pumps and solar-powered pumps make this sort of holding pond feasible.
Ponds
Ponds can be 30 times more productive in animal protein than land-based agriculture, and having one or more on your property will increase your potential yields to the max.
If you’re thinking of building a pond into your garden, you first need to make sure the land is viable for it.
Consider what type of topography you have to work with and choose the dam system that will best suit your natural resources, based on the descriptions above.
Once you’ve found a spot, you need to check if your subsoil is suitable for putting in a pond, you can either ask local geologists or excavation machine drivers about the conditions in the subsoil or dig test holes and have a look yourself.
To Self-Test Subsoil:
- Take samples of subsoil from under your proposed pond site.
- Fill a glass jar halfway with each sample.
- Fill with water and seal the top.
- Shake vigorously until all material has dissolved and place aside to settle.
- Once fully settled, look at the sediment layers.
- The bottom layer will be sand, as it’s the largest particle; the next layer will be loam and silt; the third layer will be your clay layer; and the final thin layer will be organic matter.
- Visually examine the height of the settled layer of clay as a proportion of the total height of settled soil sample. The clay layer needs to constitute at least 30% of the soil sample to ensure your pond will seal itself correctly.
If you don’t have enough clay to seal itself, you can either:
- Transport clay from elsewhere and compact a 12- to 18-inch layer (minimum) of clay into the pond base and walls.
- Use soil amendments that seal soil, like bentonite or polymers.
- Seal it with compacted animal manure or cut green cover crops. These rotting materials plug up holes between particles and help seal.
Remember to strip the valuable topsoil off any area that is to be made into a pond—this stuff is like gold for your farm, and you should never waste it.
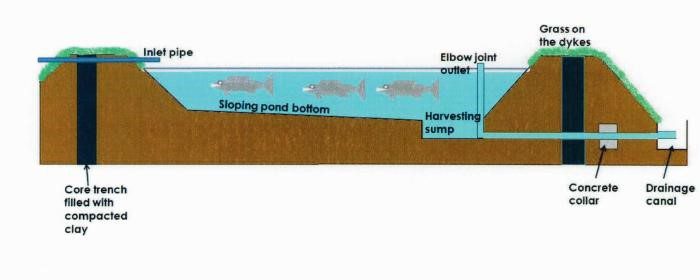
Pond Construction
A man-made pond can be either natural or artificial (lined). Natural ponds can avail of the nutrients in the soil and are often more resilient. In soil of at least 30% clay, ponds are easily sealed.
Pond building is easiest when there is a slight slope and water flows at a right angle to contour.
Examining ordinance survey maps with contours marked will reveal where you can put the shortest dam for the most water catchment. The narrow neck of a valley is a good place to start.
Compact the pond floor and walls with hand tools, machinery, or by rolling the tracks of heavy machinery forward and back to compact fully.
Remember to allow a spillway off to the side to allow excess water to flow out the side of the pond, not over the top of the dam wall where it will cause erosion. (A dam is only needed if you construct your pond on a slope.)
A keyway trench is needed to make sure your dam wall will hold up against the water. Do this by cutting a trench along the site of the dam wall that goes deeper than the pond itself—ideally you want to go deep enough that the wall will be constructed on 100% clay. If your soil doesn’t become clay, you can pack the bottom of the trench yourself with good-quality clay material at a rate of 12 inches per layer and then ram or roll it. On top of this keyway the pond/dam wall is built.
If you neglect this keyway precaution, water will likely eventually force its way under the wall, undermining pond integrity.
Calculating The Size Of Your Spillway
To prevent pond erosion and collapse adequate overflow points (spillways) should be installed for times when major rainfall occurs. A dam failure can be a huge mess, ensure you have sufficient walls and spillways to cope with major weather events.
To calculate the maximum 24-hour rainfall event, you’ve got to do a bit of historical research.
Multiply the area of your catchment by the rainfall per 24 hours in a 100-year flood downpour. (That’s the number you have to research.)
You then divide that figure by 24 (hours), then by 60 (minutes), then by 60 again (seconds).
This will give you the amount of water that your spillway needs to be able to carry per second in times of a major rain event or flood.
If your spillway is too small to handle this amount of water, make it wider.
Watch Out For…
- Sand and gravel pits: Sand is nearly impossible to seal, but it is useful for other endeavors and can be sold at decent prices. If you are lucky enough to find a sand deposit where you want to build your dam, you will have to dig it out, but you can then use it for building materials and/or sell it. If the pit is too deep to dig out, you will either have to find another location for your pond or have to buy pond liners.
- Rocks bigger than 4 to 6 inches in your dam wall: Unless you are building a very large dam, these rocks should be removed.
- Quicksand: Stay away—very dangerous.
- Volcanic clays: These clays are often heat fired into pottery and will not seal a dam.
Aquaculture Ponds
Aquaculture is the cultivation of aquatic beings, like fish or shellfish, usually for food, and it can be a great way to maximize your homestead’s bounty. We’ll talk more about the details and various forms of aquaculture tomorrow, and about aquaculture pond design in more depth on Day 19, but I want to touch on it briefly today while we’re talking water catchments…
To create an aquaculture pond, follow the instructions on how to seal your pond above. If designed correctly with swales or other water catchments, a drain pipe to allow the total draining of the pond at harvest time is best practice. You can pump out your pond if draining is not an option.
Most fresh water fish don’t live in water deeper than 2.5 meters (8 feet), so your pond doesn’t need to be deep for aquaculture farming. However, you will want to provide a deep area for the fish to shelter in when you drain the pond for fish harvesting. You’ll also need to cut shallow underwater shelves at a depth of about 2 feet around the edges of the pond.
Fish-feeding and habitat-providing plants should be grown on the pond banks, and on the underwater shelves.
You could choose to install a solar aeration pump with battery, though this isn’t necessary.
You have the option of planting a fast-growing grain crop on your drained pond bed to avail of all the nutrient-rich sediment left on the pond floor, and then returning the cycle back into fish farming the next year.
(I’ll cover aquaculture in greater depth in a future lesson.)
 Disclaimer: There are serious legal liabilities involved in dam construction (in case it breaks) and there may be a good bit of bureaucracy to overcome in order to get a permit depending on your location and the size of the pond.