Day 33: Brewing Part II—Wine
Dear Student,
 As we discussed yesterday, brewing is based on a chemical reaction between sugars and yeasts.
Today, though, instead of talking about barley and hops, we’re talking fruit and their juices—the fundamentals of wine production. In the case of wine, it’s the sugars in the fruit used that react with the yeast instead of malted barley.
Wine Production
Fruit juice is used to provide the sugar for fermentation (you can also add pure sugar to the mix if you want to increase the alcohol content or reduce the amount of fruit needed). Wine production has fewer steps than beer brewing.
Equipment Needed:
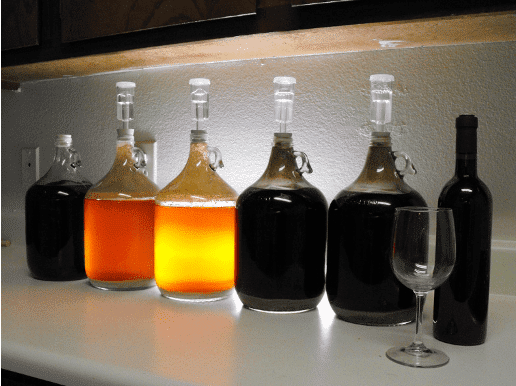
- Brewing vessel: Any size will do, but it needs to be sealable. Glass or plastic containers are easiest to clean. 5-gallon water barrels work quite well for a beginner brewer but make sure it isn’t scoured or scratched on the inside (use newer containers). Purpose-fabricated plastic wine brewing containers are available inexpensively from your home hobby store or online.
- Airlock and bung (cork with hole in it to seal the top of the brewing vessel): you can make these yourself, but plastic airlocks are available from your home hobby store or online for less than a dollar.
- A tube airlock: This can be made by attaching a hose to the bung at the top of the brewing vessel, and securing its other end underwater in a pot or tub. This allows carbon dioxide out but no oxygen into the brew vessel, maintaining the anaerobic conditions needed.
- Siphon: A clean, clear tube of four or more feet to allow the wine to be decanted after brewing.
- Funnel: For filling the brewing vessel.
- Stirrer: Any clean long implement that will fit in the mouth of the brewing vessel will do.
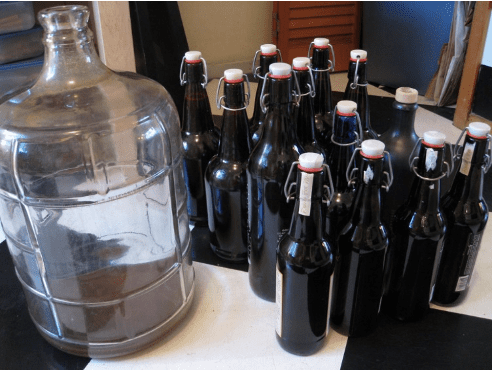
- Bottles: To store your finished product. Any used wine or other bottles will do as long as they can be sealed; if you use corks, consider buying a re-corker. Glass bottles are best.
- Cleaning materials: It’s extremely important to disinfectant all equipment. Use bottle brushes and any other tools available for the purpose—this is not optional, it’s necessary. Rinse very well after cleaning to remove any soaps or chlorine.
- Turkey baster: To sample the wine in the brewing vessel before decanting (putting in bottles).
Ingredients:
Makes 5 gallons.
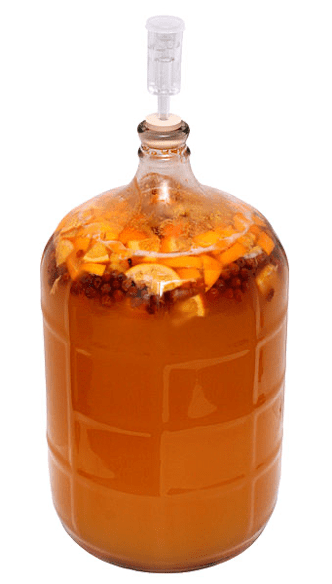
- Fruit juice:
- Grape is traditional, but any pure fruit juice, concentrated or fresh, will do.
- Avoid juices with chemical additives or preservatives other than ascorbic acid; if it contains sorbate, don’t use it.
- If using fresh juice, you need 5 gallons.
- If using concentrate, add water to return to its original concentration.
- You can also mash and boil fruit from your garden and strain through a muslin bag or sheet to make the juice.
- Yeast:
- It doesn’t pay to cut corners here. If you are making a dark wine, use red wine yeast; if you are making a light wine, use a white wine yeast.
- Brewer’s yeast will do, but it reduces flavor quality, so for optimum results, purchase wine yeasts from your hobby store or online.
- Do not use distillers’ yeast.
- 1 packet is usually enough for 5 gallons or more.
- With practice, you can save yeasts from one batch and use it in another.
- Sugar:
- 4 to 5 lbs.
- Dextrose or corn sugar is recommended, but any refined sugar will do.
- If you are using ordinary sugar, white or brown, consider making a simple syrup first. This involves boiling 2 parts sugar in 1 part water for 10 minutes at a low heat. This splits the sugar into fructose and glucose and makes it easier for the yeast to metabolize the sugars.
- Chemical additives (available online)
- Sodium/potassium metabisulfite: A commonly used wine preservative; this might not be needed if you pasteurize the juice first or it has been done before you bought the juice. (Do not use if you are allergic to sulfides.)
- Potassium sorbate: Allows you to add sugar after the brewing without reactivating the yeast.
- Yeast nutrient: Assists the yeast metabolize the sugars.
- Finings: Clarifiers like bentonite powder to remove sediment.
Process:
 Clean and sanitize your equipment; this is vitally important. All equipment and utensils must be fully disinfected. Failure to do so diligently will result in rotting juice, not fermentation. Do not skip this step. (Remember that the bottles should also be cleaned with the same degree of diligence.)
- Add the sugar and juice. Stir or swirl until all the sugar is dissolved. (Keep the juice bottles to decant the wine into if you don’t have enough glass bottles.)
- Dissolve the yeast in warm water with a little sugar in it and let stand. Add to the juice solution after five minutes and stir well. Make sure to leave about 4 inches at the top of the brewing vessel to allow for fermentation foam and gasses.
- Mix the solution for three minutes or until all ingredients are dissolved.
- Prime the airlock and attach it to the brewing vessel. Pour water in the top of the airlock to fill it halfway. Push the airlock securely into the bung and the bung into the mouth of the brewing vessel. If you are using a tube airlock, ensure the tube end is securely placed underwater in a jar.
- Place in a dark, out-of-the-way area at 65°F to 70°F on average (18°C to 21°C) to ferment for four to six weeks or until the fermentation process completes (when the bubbling of the airlock stops).
- If over this time the airlock becomes clogged with scum, remove and wash with water, refill with water and re-seal the vessel.
- If the airlock runs dry, refill it.
- After the fermentation finishes, remove the airlock and take a sample of the wine. If it is clear of suspended sediment and to your liking, skip to step 9; if not, continue to step 8 to troubleshoot.
- Troubleshooting:
- If the wine is too sweet, there is too much sugar left and you can choose to restart the fermentation process by using a half packet of yeast and a teaspoon of sugar dissolved in a cup of warm water. Reintroduce the yeast mix, stir gently, and let sit for a week. The fermentation process should restart and the excess sugar should be metabolized by the yeast. However, be careful here. Too much sugar added just before bottling, even using sodium sorbate, can cause fermentation and pressure building up in the bottles. This might lead to broken glass bottles or leaking containers, so beware.
- If the wine is too tart or dry, you can add sugar along with some sodium sorbate. This will sweeten it without reactivating the fermentation process.
- If the wine is too cloudy, you can add finings like bentonite powder, a natural clay substance that clings to particles and clarifies the wine, and leave overnight.
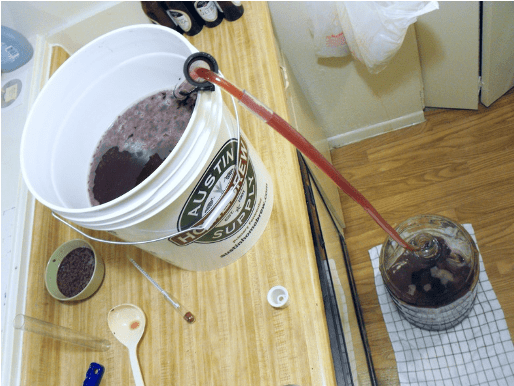
- Once you are happy with the flavor of the wine, siphon the wine into a clean 5-gallon container, being very careful not to disturb the layer of sediment that has accumulated at the bottom of the vessel. (you can decant the wine directly into wine bottles if you like… just be care not to spill too much).
- To siphon, put the brewing vessel on a table or raised surface.
- Allow any disturbed sediment to settle again.
- Submerge one end of the clear plastic tubing into the brewing vessel to within 2 inches of the sediment at the bottom.
- Gently suck the air out of the tubing until wine is about to touch your lips. Place your finger over the end of the tube and maintain the vacuum in the tube.
- Lower the end of the tube in your hand to below the level of the bottom vessel. Release your finger and wine will flow out of the vessel.
- Be careful not to suck sediment into the tubing as this will make your wine cloudy.
- If the end of the tube in the vessel rises above the water, the siphon will be broken and you will have to redo steps a through f.
- To bottle your wine, either pour or siphon your final product into the glass bottles or containers you have gathered for this purpose. Fill the bottles to within 1 inch of the top of the container and seal or cork tightly.
- Store your bottled wine in a cool place and chill to taste before consuming. Wine can be stored for years, but it’s best to consume fruit wine within a year or two until you are experienced at producing them.
 If the wine smells rotten or tastes off in any way, don’t consume.
Fruit wine will not all taste like the classical grape wine you buy in a store, but with practice a myriad of flavors and recipes can be explored.
Cheers!