Drying Methods
Sun Drying
In hot, dry climates, sun drying is an efficient way to dry food, but you have to be careful trying this in cool, moist environments where it’s more likely to allow the food to go bad.
If you are lucky to have temperatures of 100°F (40°C) and low humidity, this is the perfect method for you. The climate minimums for this method are 86°F and 60% humidity or less.
This method is best for fruits; it’s not usually used for drying vegetables, as their moisture content can be too high (nor for meat, as the protein content increases risk of spoilage).
Sun Dry Process:
- Create drying trays by stretching a cotton sheet, cheesecloth, or plastic window screen over a frame (could be a picture frame or something you construct yourself out of wood or plastic).
- Place the pieces of produce on the frame(s) and leave outside in direct sunlight or in a sunny window sill.
- Turn the produce after two days.
- After four days, the produce should be dried, though you could go longer if you’re looking for a more brittle texture.
- Use either heat or freezing cold to pasteurize your dried produce. Freeze the food pieces for three days in a moisture-proof container or zippered plastic bag. Alternatively, you can heat the pieces to 180°F (82°C) for 30 minutes.
- Bring the food back to room temperature after post-drying. Food dried in this way can be stored in an airtight container for up to six months.
Oven Drying
This method is effective, but it’s not the most expensive and is wasteful of energy.
- Preheat your oven to 145°F (62.8°C).
- Place the pieces of produce on closely meshed oven racks or on a sheet of clean cotton.
- Prop the oven door open slightly with a wooden implement to allow the moisture to escape.
- Leave produce to dry for 4 to 12 hours until done. It should be pliable or brittle depending on the produce.
- Use either heat or freezing cold to pasteurize your dried produce. Freeze the food pieces for three days in a moisture-proof container or zippered plastic bag. Alternatively, you can heat the pieces to 180°F (82°C) for 30 minutes.
- Bring the food back to room temperature after pasteurization. Food dried in this way can be stored in an airtight container for up to six months.
Electric Dehydrator
Buying a home or commercial dehydrator can seem expensive, but it simplifies the drying process significantly. While some dehydrators are expensive, they can pay for themselves in a couple of years and save you time and effort. If once you’ve begun to dehydrate you enjoy it enough to do it regularly, then a dehydrator is worth the investment.
Uncertainty in the drying process is virtually removed by using this equipment; simply consult the instructions and set the timer for perfect results. An electric (or solar) dehydrator are good for drying produce, meats, and more.
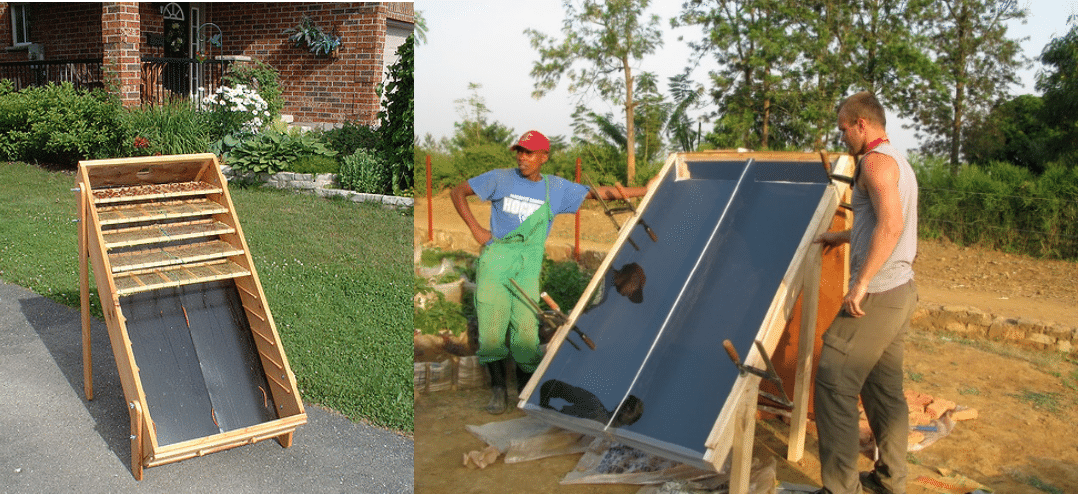
Passive Solar Dehydrator 
A passive solar dehydrator is an inexpensive and effective method of drying large amounts of food using the free energy of the sun. You can build your own or buy one, both will have a reflective inner surface to concentrate the heat of the sun and a chimney or vent at the top to allow the hot air to rise, drawing the moisture from the food.
Sun heat is trapped by the glass on the dehydrator and rises up into the drying chamber accelerating the drying process. Remember to bring the food in at night to avoid condensation moisturizing the food again.
Post-Drying Process
After drying, you must be sure to kill any remaining pest eggs or microorganisms by pasteurizing your food…
Pasteurization: Use either heat or freezing cold to pasteurize your dried produce. Freeze the food pieces for three days in a moisture-proof container or zippered plastic bag. Alternatively, you can heat the pieces to 180°F (82°C) for 30 minutes.
Once you’ve completed the drying and pasteurizing, make sure to correctly store your dried food…
Storing: Store in a cool dry place in an airtight container or zippered plastic bag out of direct sunlight.
When you’re ready to eat, you can eat directly or rehydrate (for direct consumption or for use in recipes)…
Rehydrating: Cover in boiling water and set sit for 4 to 8 hours. Cook in the same water.
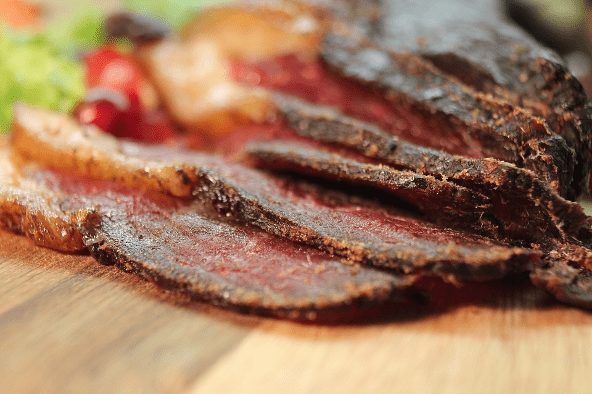
Drying Meat
The drying of meat follows much the same process as drying fruit or vegetables but for safety the drying temperature must be kept above 140°F (60°C).
 All meats should be cooked before drying until you are very familiar and proficient with drying and can be sure of the high quality of your meat source.
Use only the leanest meat you can find, and don’t use pork or chicken—the fat content makes them less suitable for storage. Beef, venison and lean lamb are best.
Marinating the meat first boosts flavor and allows you an opportunity to experiment with flavors.
Dried meat can be kept for up to two months in a cool place. However, when combined with smoking processes (which we’ll discuss on Day 38), the shelf life can be greatly extended.
Simple Meat Marinade Recipe:
- 1½ to 2 lbs lean meat
- ¼ tsp black pepper
- ¼ tsp garlic powder
- ¼ cup soy sauce
- 1 tsp hickory-smoke flavored salt
- 1 tbsp Worcestershire sauce
Oven Drying
- Boil a pound of 1-inch beef cubes or strips for one hour (all pieces should be completely submerged).
- Place meat pieces on drying trays and leave in oven at 140°F to 150°F (60°C to 65.6°C) for four to six hours. Make sure to prop door open to allow moisture to escape.
- Cut pieces open. If there is any additional moisture left, put back in oven to dry at a lower temperature (120°F to130°F) until fully dry.
- To rehydrate, cover 1 cup of meat with 1 cup of water and let stand for four hours. Use in casseroles, soups, stews, or simmer in boiling water for an hour.
Alternatively, a commercial dehydrator can be used for convenience and consistency.
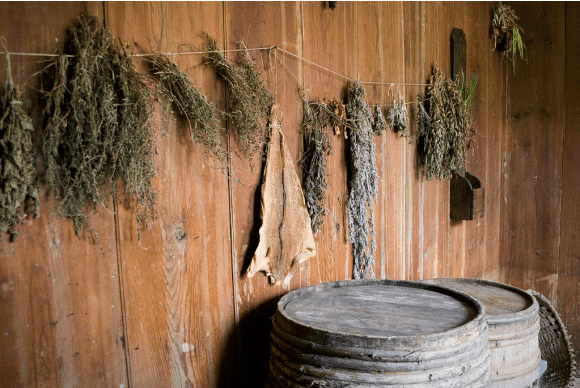
Drying Herbs
Many herbs have medicinal as well culinary uses, and drying your own herbs is a great way to ensure you have nutritious and health-boosting herbs year-round.
Some herbs that are suitable for drying include:
 Thyme
Thyme- Sage
- Rosemary
- Oregano
- Mustard Seed
- Lavender
- Dill
- Chamomile
- Bay Leaf
- Mint
- Many more…
Harvest herbs just before flowering, as this is when most essential oils are present in the plant. Cut the herbs 6 inches from the ground.
Air Drying
- Tie herbs in small bunches with string and leave hanging upside down out of the sun in a dry, warm, airy place. Don’t dry or store in hot places, as this destroys the essential oils.
- When the herbs are fully dry, put in a warm oven for 3 minutes for finish them off.
- Strip the leaves off the stems and store the leaves in a cool dry place.
Oven Drying
- Place the herbs on a drying sheet/tray in the oven and leave at 140°F for 45 minutes to an hour, with the door propped open slightly.
- To check if the herbs are fully dry, place in an airtight container overnight.
- If condensation appears, they are not fully dry; return to oven.
Dehydrator Drying
Follow the instructions that come with your dehydrator and store in an airtight container for up to six months